Lesson 1
It is the first lesson on subtraction. It goes over the first model of subtraction, which is subtraction by taking away. Let’s take a look at part 1. In part 1 students cross off the correct number of objects to show that, they are taking them away. As it says here, we will memorize these facts in later lessons.
Part 1: To subtract means to take away. Solve each subtraction problem. Cross of the correct number of objects to show that you are taking them away. (We will memorize our facts in later lessons)
Part 2: Write the correct subtraction problem shown by each diagram
Worksheet for the lesson
Lesson 1 Subtraction worksheet pdf downloadLesson 2
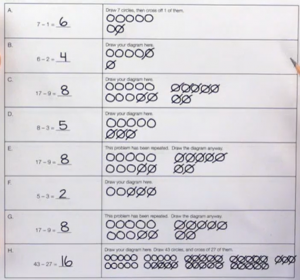
Part 1: Solve each problem by drawing a simple diagram in the space provided. We will memorize our facts in later lessons. Then, follow along with your instructor to answer the questions below.
Boxes C, E, and G are repeated. You will see why when we get to Box J.
Box H involves a lot of work. You will see why in the next problem.
I. Which problem above was the most time-consuming one to solve by drawing a picture? H.
J. Which three problems were repeated? C, E, and G.
Instead of drawing the same picture three times just to get the same answer every time, we can just memorize that 17 – 9 = 8.
K. Later, we will use the addition facts that we already know to help us memorize our subtraction facts.


Worksheet for the lesson
Lesson 2 Subtraction worksheets pdf downloadLesson 3
Subtraction by “taking away” is easiest when taking away just 1, 2, or 3. (These facts are also some of the easiest to memorize.) Make sure to count backwards accurately.
Part 1, Part 2: Count backwards.
Part 3: Count backwards to subtract. Most of these problems are in Zone 2 of the addition chart (single-digit minuend)
